|
9.
ALL BOLTS IN THE WALLS AND ROOF MUST NOW BE
TIGHTENED
With all of the bolts in all of the panels started,
the overall tightening operation can now begin. Use
the 7/16” ratchet and socket or cordless drill and
socket. Tighten all of the roof-to-wall bolts first
- then, work your way down from top to bottom on
each of the wall-to-wall seams until all are
tightened. Do not exceed about 25 foot pounds
torque when tightening these ¼” bolts.
All
Floor Bolts Must Now Be Tightened Now
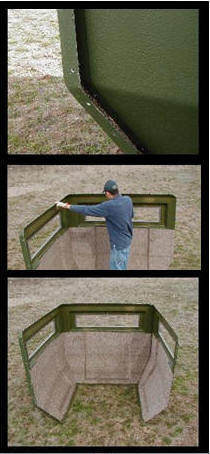
11 Roll the blind over onto its side with thedoor
facing to one side. One person should then get
inside the blind to position the floor. [make
sure to hold the floor from falling onto the wall by
reaching thru the door when rolling the blind
over and be sure the surface under the wall is free
of objects that might puncture the wall or damage it
] The other person should stay outside the blind
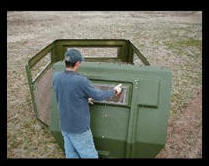
to attach the 3/8" nuts and washers. The person
inside the blind can use a tapered punch or
screwdriver to reposition the floor slightly to
obtain the proper alignment. Once the first hole is
aligned, the person inside should insert a 3/8” x 2”
bolt & washer through the hole in the floor and the
hole in the wall panel. With the bolt fully
inserted, a washer and nut can be loosely attached
underneath. Repeat the same process for all floor
bolts. IF YOU
ARE ATTATCHING TO A TOWER IF SO GO TO TOWER
INSTRUCTIONS..
NOTE
– Your blind is now ready for anchoring to the
ground (if used as a ground blind) or to a tower if
you desire. All ground blinds and elevated blinds
should be securely anchored to the ground to ensure
stability in high winds. It
is the sole responsibility of the purchaser to carry
out this anchoring operation in order to ensure
safety. It is highly recommended that all
anchor lines for elevated blinds be attached
directly to the tower instead of the blind.
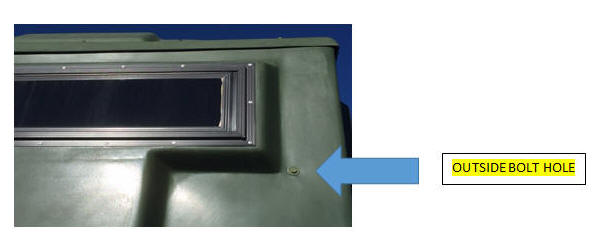
SHOOTER SHELVES INSTALLATION
STEP 1-
LOCATE THE CENTER SHELF AND ATTACH IT TO THE WALL
DIRECTLY ACROSS FROM THE DOOR. HOLD IT IN PLACE
DIRECTLY IN FRONT OF THE WINDOW BY INCERTING 2 BOLTS
FROM OUTSIDE THE BLIND INTO THE SHELF
[LEAVE BOLTS LOOSE UNTILL ALL SHELVES ARE IN PLACE]
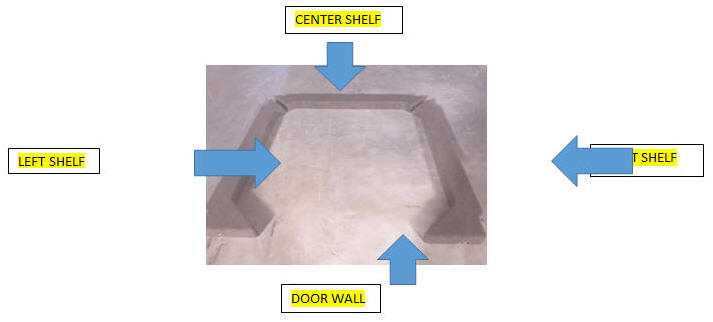
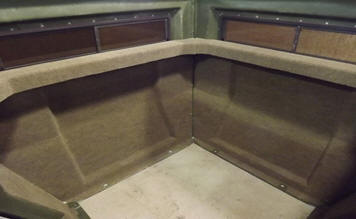
STEP 2
–
INSTALL ONE OF THE REMAING SHELVES ON THE SIDE
[BUTT THE MATCHING
END OF THE SHELF UP TOO THE END OF THE SHELF ALREADY
INSTALLED IN THE CENTER WALL] THESE SHELVES
FIT VERY TIGHT AND WILL TAKE A LITTLE EFFORT TO
ALINE UP WITH THE BOLTS HOLES IN THE WALL [IF NEEDED
TAKE A SMALL SCREWDRIVER AND STICK IT THRU THE
OUTSIDE WALL BOLT HOLE AND THE CLIP NUT ON THE SHELF
TO HELP LINE IT UP.] REPETE STEP 2 FOR THE
REMAINING SHELF.
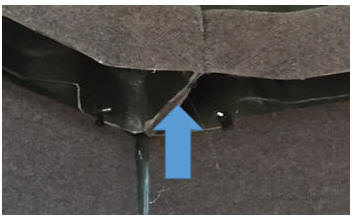
STEP 4
–
UNDER THE SHELF ON BOTH CORNERS WHERE
ALL 3 SHELVES MEET THERE ARE 2 MORE BOLTS THAT
ATTATCH ALL 3 SHELVES TOGETHER , AFTER YOU INSTALL
THEM, MAKE SURE ALL THE SHELVES ARE FLUSH WITH
BOTTOM OF THE WINDOW OR JUST BELOW THEN TIGHTEN ALL
THE BOLTS UP.
 |